Have you ever wondered how web pros take those awesome product shots? In the past year, I've learned first hand that jewelry is actually one of the toughest subjects to shoot. Since starting Yvette Designs, it's been photo trial and error the whole way.

So far, I've used studio hot lamps with mixed results, natural light, which was way too harsh, and a rigged cardboard box that has carried me through until now. Yes, a cardboard box. I cut two sides out, and cut the top where I shoot the image from. Then, I taped velum paper to the two sides which serve to diffuse natural light rather well.
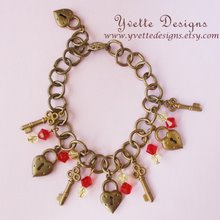
 Now, I have this handy plastic dome (above) which my jeweler mentor lent to me. Since I used a different colored background than usual in the new photos, it's hard to gauge just how much better this pricey contraption really is than my penny photo studio, the cardboard box. Compare the photos on the sidebar (complements of box) to the ones here. What do you think?


6 comments:
Thanks for the lesson, Yvette, I could use a little assistance with this.
http://www.artisan-jewelry.blogspot.com/
wow! i've never seen one of these before. photographing jewelry is so hard-- you've done a much better job than i have!
Love the new blog! I do notice a little difference with the new dome pics-there aren't shadows behind the product anymore. Looks good!
Thanks everyone for your input!
Thanks for the tip! I've got a new blog to add to my list :)
I love the dome.....never seen anything like it before!!
Ouissi x
Post a Comment